System Design
Table of Contents
Zero To Millions of Users⌗
In this section, we will explores the process of scaling a system from supporting a single user to eventually serving millions of users.
Single Server Setup⌗
In any system development journey, it’s best to begin with a simple step, and that applies even to complex systems. We initiate this process by running everything on a single server. This single server setup includes web services, applications, databases, caching, and more.
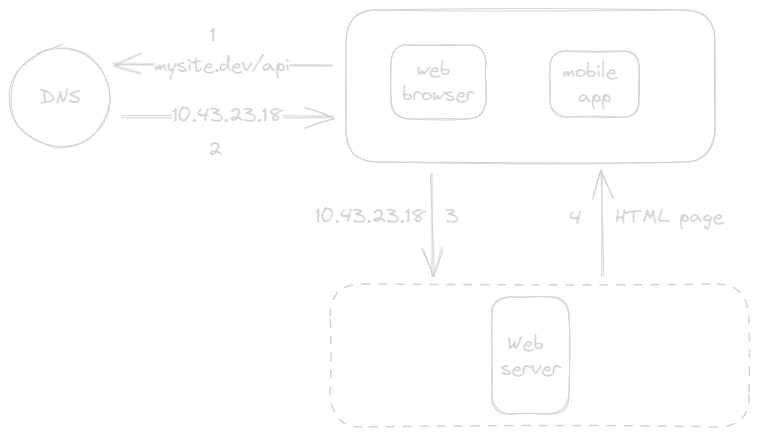
- User access websites through domain names, such as mysite.dev. Domain Name System (DNS) is a third-party paid service not hosted by our system.
- DNS translates the domain name into an IP address, such as 10.43.23.18 in the figure.
- Once the IP address is obtained, HTTP requests are sent directly to the web server.
- The web server returns HTML pages or JSON response for rendering.
The traffic to this single server comes from two primary sources:
- Web App: It utilizes server-side languages (e.g., Java, Go, Python) for business logic and storage, along with client-side languages like HTML and JavaScript for presentation.
- Mobile App: HTTP protocol facilitates communication between the mobile app and the web server. JSON is commonly used for API responses due to its simplicity.
Scaling with Multiple Servers⌗
As the user base grows, relying on a single server is no longer sufficient. We need to move to a multi-server setup, separating web/mobile traffic from the database. This separation allows for independent scaling of web/mobile traffic servers and database servers.

Choosing the Right Database⌗
When it comes to databases, there are two main categories to consider: Relational Database and Non-Relational Database.
Relational Databases:
- These are often referred to as relational database management system (RDBMS) or SQL database.
- Data is structured in tables and rows.
- SQL is used for joining data from different tables.
- Popular databases options: MySQL, PostgresSQL, Oracle database, MSSQL, etc.
- This technology has been around for more than 40 years.
If relational databases doesn’t suit your specific use case, it’s essential to explore beyond relational databases.
Non-Relational Databases:
- Also known as NoSQL databases.
- Categorized into:
- Key-value stores
- Graph stores
- Column stores
- Document stores
- Typically, non-relational databases do not support join operations.
- Popular databases options: CouchDB, Neo4j, Cassandra, MongoDB, Amazon DynamoDB, etc.
- Non-relational databases might be the right choice if:
- Requires super-low latency.
- Deal with unstructured data.
- Need to store a massive amount of data.
Scaling the Database⌗
There are two ways to scale database: Vertical Scaling and Horizontal Scaling
Vertical Scaling:
- This involves adding more power (CPU, RAM, etc.) to your existing servers.
- Vertical scaling is suitable when traffic is low, and its simplicity is an advantage.
- However, it has limitations, including a hard limit on resources and a lack of failover and redundancy.
Horizontal Scaling:
- This approach involves adding more servers to your resource pool.
- It is more suitable for large-scale applications, addressing the limitations of vertical scaling.
In the previous design, users connected directly to the web server, leading to potential issues like server unavailability or slow responses during high traffic. To address these challenges, load balancing comes into play.
Load Balancer⌗
Load balancers distribute incoming traffic evenly among a set of web servers defined in a load-balanced configuration.
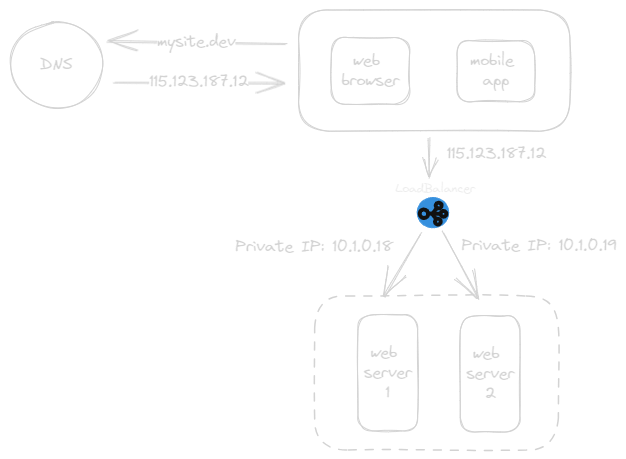
As shown in above diagram:
- Users connect to the public IP of the load balancer directly.
- The load balancer then directs the request to one of the web servers via a private IP for enhanced security.
- Private IPs are used for server-to-server communication within the same network.
This setup resolves the issue of server unavailability and enhances web tier availability. For instance:
- If one server goes offline, traffic is automatically redirected to another server, preventing downtime.
- As website traffic grows, additional servers can be added to the pool, and the load balancer will distribute requests accordingly.
The current design includes a single database, which lacks failover and redundancy. To address this, let’s explore database replication.
Database Replication⌗
Database replication involves establishing a master-slave relationship between the master and the slave databases.
- The master database primarily handles write operations.
- Slave databases replicate data from the master but are typically reserved for read operations.
- Any data-modifying commands, such as insertions, deletions, or updates, are directed to the master database.
- Most application requires a much higher ratio of reads to writes; thus, the number of slave db in system usually larger than the number of master db.
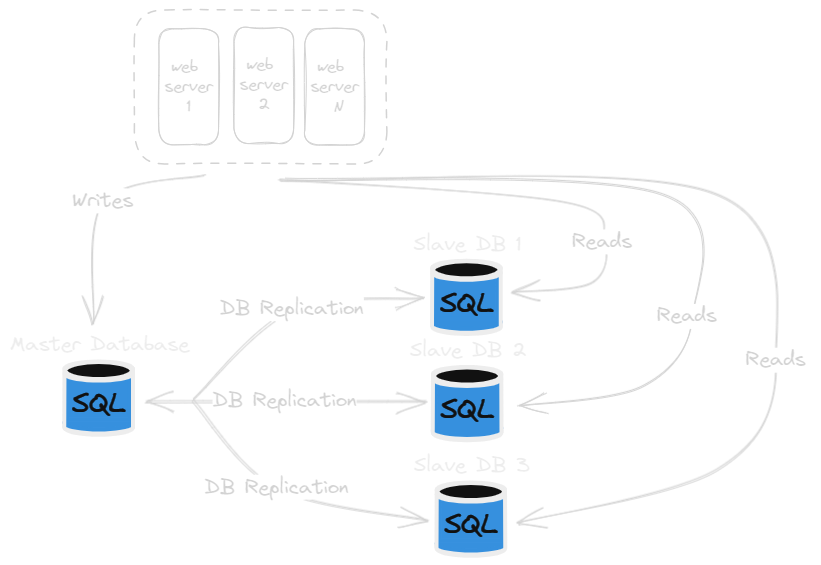
Advantages of database replication:
- Enhanced Performance: In a master-slave model, the master handles write and update operations, while read tasks are efficiently distributed to slave nodes, improving query processing performance.
- Reliability: Data is preserved, even in the event of natural disasters, preventing data loss. We do not need to worry about data loss because data is replicated across multiple locations.
- High availability: Even if one server breaks, the website continues to function, using data from another server, ensuring smooth operation.
What if one of the databases goes offline?⌗
- If there’s only one slave database available, and it experiences an outage, read operations will temporarily shift to the master database. As soon as the issue is detected, a new slave database will replace the faulty one. In cases where multiple slave databases are in operations, read operations are rerouted to other healthy slave databases. A new database server will promptly replace the problematic one.
- In the event of the master database going offline, one of the slave databases will be promoted to assume the role of the new master. All database operations will be temporarily executed on this newly appointed master database. Simultaneously, a new slave database will be introduced to ensure data replication continues seamlessly.
In practical production systems, promoting a new master is more intricate, as the data in a slave database may not be up-to-date. This necessitates the execution of data recovery script to reconcile the missing data. Although alternative replication methods such as multi-master and circular replication exist, they tend to be more intricate in nature.
Let’s examine the system design:
- When a user wants to access the system, they obtain the IP address of the load balancer via DNS.
- Using this IP address, the user establishes a connection with the load balancer.
- The load balancer routes the HTTP request to either Server 1 or Server 2.
- A web server retrieves user data from slave database.
- Any data-modifying operations, such as write, update, or delete actions, are directed to the master database.
With understanding of the web and data tiers, the next step is to enhance the systems’s response time. This can be achieved by introducing a cache layer and transferring static content like JavaScript, CSS, Images, and Video files to a content delivery network (CDN).
Cache⌗
A cache is a temporary storage. It stores frequently accessed data in memory so that requests are served more quickly. Whenever web page loads, one or more database call are executed to fetch data. It highly impact the performance of the application by calling the database repeatedly. The cache can mitigate this problem.
Cache tier is a temporary data store layer, much faster that the database. Having a separate cache tier benefits the:
- System Performance
- Reduce Database Workloads
- Scale the Cache Tire Independently
Caching strategy depends on the data and data access patterns.
Below are Caching Strategies:
Read-Through Cache⌗

After receiving a request:
- Web server checks if data exists in cache.
- If exists it returns the data.
- If not exists, it queries database for data, and save the response data in cache and send it back to client.
- This caching strategy is called a read-through cache.
Pros:
- Automated Data Fetching: Read-through caches automate the process of fetching data from database and populating the cache, reducing the burden on application logic and developers. This can simplify application code and improve maintainability.
- Data Consistency: Since data is fetched and populated by the cache provider, there’s a higher likelihood of data consistency between and the database, reducing the risk of serving stale data.
- Optimal for Read-Heavy Workloads: Read-through caches are particularly well-suited for read-heavy workloads where the same data is requested frequently. They minimize the load on the primary data store(database) and improve response times for commonly accessed data, such as news stories.
Cons:
- Cache Miss Penalty: The first request for data in a read-through cache always results in a cache miss, incurring the extra penalty of loading data to the cache. This can introduce latency for the initial requests.
- Warming or pre-heating: To mitigate the cache miss penalty, developers often need to manually warm or pre-heat the cache by issuing queries in advance. This adds complexity and requires careful management.
- Lack of Flexibility: Unlike Cache-aside, where the data model in the cache can differ from that in the database, read-through caches typically do not allow for different data models. This limitation may be a drawback in some scenarios.
Cache-Aside⌗
- Application directly talks to both the cache and the database.
- No connection between the cache and the database.
- All operations to cache and database are handled by the application.
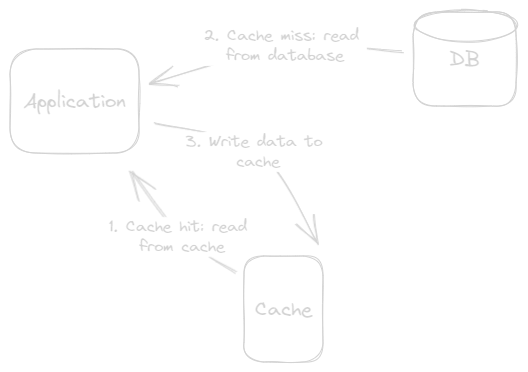
Here is what happing:
- When the application need data, it first checks the cache for the data.
- If the data is not found in the cache (a cache miss), the application fetches the data from the primary data store (eg. a database).
- After fetching the data, the application insert or updates it in the cache, associating it with a specific key. The update can be synchronous or asynchronous, depending on the design.
- The application uses the data from the cache for subsequent read requests until the data expires or is invalidated.
Pros:
- Read-Heavy Workloads: Cache-Aside is well-suited for read-heavy workloads, efficiently reducing the load on the primary database.
- Resilience to Cache Failures: Systems using Cache-Aside remain operational even if the cache cluster fails since they can directly access the database. This provide resilience and ensure system availability.
- Flexible Data Models: Cache-Aside allows for different data models in the cache compared to the database. It’s versatile for storing responses resulting from multiple queries against a request ID.
Cons:
- Data Inconsistency: When data is written to the database, the cache may become inconsistent. Developers often rely on Time to Live (TTL) to serve stale data, but this can lead to inconsistencies and issues with data freshness.
- Stale Data: In cases where TTL is used, there’s a risk of serving stale data until the expiration, which might not be suitable for applications requiring up-to-date information.
- Lack of Cache Consistency: Cache-Aside doesn’t guarantee cache consistency, potentially resulting in multiple clients fetching and updating the same data simultaneously. This can lead to data inconsistency.
- Peak Load Issues: If the cache fails during peak loads, response times can get worse(deteriorate), and in extreme cases, it might even overwhelm the database, impacting system performance.
Write-Through Cache⌗
- In this strategy data is written both to the cache and to the underlying data store, such as a database, simultaneously.
- This ensure that the cache and the data store always have consistent data.
- When a write operation is performed, it is first written to the cache and then immediately written to the data store.
- This approach is often used in scenarios where data consistency is critical, but it can introduce higher latency for write operations due to the additional write to the data store.

- When the application performs a write operation(eg., update, insert,etc.), the data is first written to the write-through cache.
- The Cache immediately forwards the write operation to the underlying database to ensure data consistency.
- The Cache always reflects the most up-to-date data in the database, maintaining data consistency.
Pros:
- Data Consistency Guarantee: Ensures strong data consistency without cache invalidation.
- Seamless Integration with Read-Through Cache: Works well with read-through caching for comprehensive performance and consistency.
- Simplified Cache Management: Eliminates the need for complex cache invalidation strategies. Ensures that the cache remains synchronized with the data store.
Cons:
- Write Latency: Introduces extra write latency due to dual write operations.
- Storage Overhead: May required increased storage, leading to higher infrastructure costs.
Write-Around Cache⌗
- Data is written directly to the data store(database) and only the data that is read makes it way into cache.
Pros:
- When it combine with read-through it provides good performance in situations where data is written once and read less frequently or never.
Write-Back Cache (Write-Behind)⌗
- In this write operations are initially written to the cache and subsequently asynchronously written to the underlying data store (database).
- It is used to optimize write operations, reduce write latency, and improve application performance by acknowledging writes quickly, without waiting for the data to be written to the data store (database) immediately.

Pros:
- Reduce Write Latency: Improves application responsiveness by acknowledging writes quickly.
- Optimized Write Throughput: Allows the application to continue processing without write delay.
- Improved Application Performance: Allows the application to continue processing without write delays.
- Mitigation of Write Spikes: Smooth out the load on the data store during write bursts.
Cons:
- Data Inconsistency Risk: Potential data inconsistency between the cache and the data store.
- Data Loss Risk: Risk of data loss in case of cache or system failures.
- Complex Cache Management: Requires additional mechanisms for data consistency.
- Storage and Infrastructure Costs: Increase operational costs due to added storage and resources.
Determine the appropriate times to implement caching. Opt for caching when data is regularly read but seldom updated. Since cached data resides in volatile memory, it’s not suitable for data persistence. For example, if a cache server undergoes a restart, all in-memory data is erased. Consequently, it’s crucial to store critical data in durable data repositories.
Reference: https://codeahoy.com/2017/08/11/caching-strategies-and-how-to-choose-the-right-one/
CDN (Content Delivery Network)⌗
A Content Delivery Network (CDN) is geographically distributed network of proxy servers and their data centers that provide high availability and performance by distributing the service to end-users.
CDNs cache content like web pages, images, and video (static contents) in proxy servers near to the physical location of the user, allowing them to access internet content from a web-enabled device or browser more quickly through a server near them.
Benefits of CDNs:
- It reduces latency in communication created by a network design.
- It improves website performance.
- It support core network infrastructure, such as:
- Reducing page load time
- Reducing Bandwidth costs
- Increasing protection against security attacks and downtime.
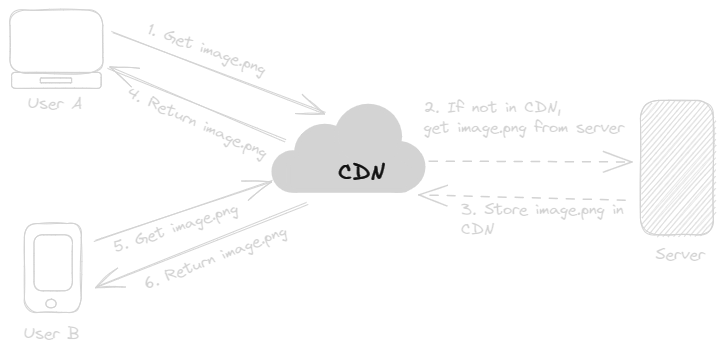
- User A access the image.png through application. In application embedded image.png url is CDN url. (request will go to nearest CDN server for client.)
- If image.png is not in CDN server, it requests to origin server.
- Origin server stores content in CDN Cache.
- It returns the loaded content (image.png) to User A.
- User B is accesses same image.png.
- CDN returns the content faster than User A. As Content is already present in CDN server.
The Content will be present in CDN cache as long as the TTL has not expired.